Latest Entries »

After installing all Oracle Form Builder components successfully when we start frmbld.exe, sometimes it ends up with the fetal error

FRM-91135: Fatal error: ORACLE_HOME\forms\mesg\fmcus.msb not found

Untitled

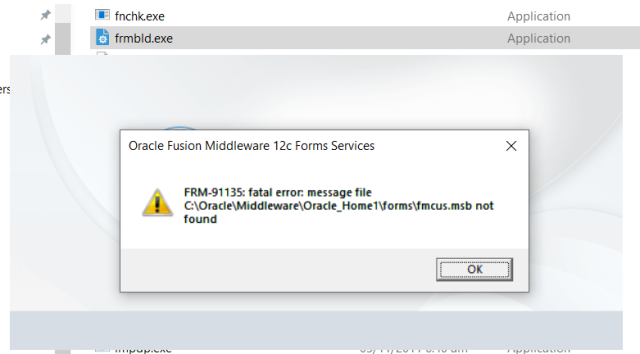
Below things worked for me and hopefully it may help someone.

  1. Check the ORACLE_HOME path in Environment Variable > System variables.

    If the system variable is missing the ORACLE_HOME then create a new variable and enter that suggested path as per the below image.

    If the existing variable does not have the correct path value where the form builder is installed, copy the correct path and paste in the variable value.

    oracle_home

  2. Another thing to check (could say optional) is the path variable and add the frmbld.jar fiel path as shown in the below image.

    (Note: It didn’t make any difference for me but I found some suggestions by users in google so thought to add as it might be helpful to someone)

    path

  3. The registry. Below is my registry that is working. It is strange that the ORACLE_HOME variable in the registry had the correct path as per the installation directory, but the environment variable had a different path.

    registry

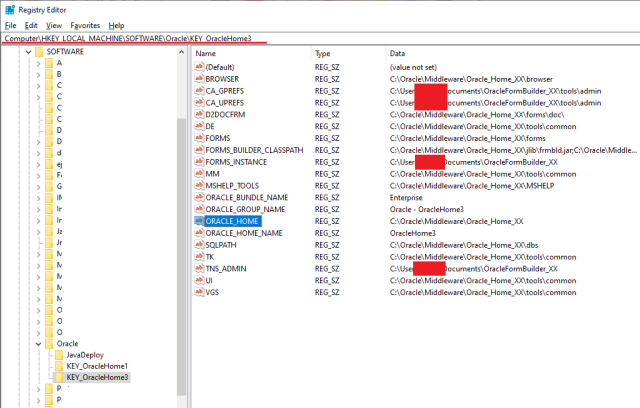
    So for me, it was showing error initially. Then I followed the first step as above and as soon as I set environment variable path, I get rid of the fatal error.


Good luck.

Cheers.

Sometime Oracle users may not have access of certain concurrent requests. That means the user will not be able to submit a standard concurrent request available on Oracle. This document is prepared to permit the users to submit a concurrent request.

Below are the steps to make a concurrent program available to a user.

1. Assign the application to the request group

  • Log in to Oracle with the System Administrator responsibility.
  • Navigate to Security > Responsibility > Request and the Request Groups window will open as shown in the following screenshot1
  • Now, create a new group or update the existing group assigned to the existing responsibility.

    Ex: I will add the “Work in Process” as shown below and save2

2. Assign the request group to the responsibility

  • Log in to Oracle with the System Administrator responsibility.
  • Navigate to Security > Responsibility > Define and the Responsibilities window will open as shown below3
  • In this form, create a new responsibility or search the existing responsibility assigned to the user who wants permission/access to submit the concurrent request
  • Once responsibility details finishes, enter the request group name as shown below. Make sure the Request Group Name and Application matches to the Request Group Name and Application we created/modified during step 1 above in this doc.4

Assign the responsibility to the user

  • Log in to Oracle with the System Administrator responsibility.
  • Navigate to Security > User > Define and the Users window will open5
  • Search the user name and add the responsibility created/modified in the above step 2, as shown below

6

  • Save and close


Now the user MFG will have access to the “Work in Process” concurrent requests like WIP Mass Load etc.

Frequently in Oracle we face Inventory Period error for different transactions.

Like,

Please enter a GL Date within an open inventory accounting period.
Cause:        You provided a GL date that is not within an open inventory accounting period.
Action:        Enter a date that is within an open period.

OR

APP-PO-14376. Please enter a GL date within an open Purchasing Period.

OR

APP-PO-14230 GL date is not in an open mode.

By considering safe-side I thought it would be good to check all the available options that cause this error and has to be opened.

Main 3 options that need to check are as below:

  1. Ensure the Receipt Date falls into a GL Period that has Status=Open
    Receipt Date
  2. Ensure the Purchasing Period is Open
    Purchasing Period
  3. Please DON’T FORGET that the Inventory period must be Open too
    Inventory period

In Oracle, if lot controlled item is set to generate lot number automatically with “Prefix” and if you try to generate it, it may give an error with APP-INV-05373: Please check lot defaulting controls. oracle_error1One of the reason could be Lot No’s length

[Navigate to Inventory -> Setup -> Organizations -> Parameters]

oracle_error1.2 
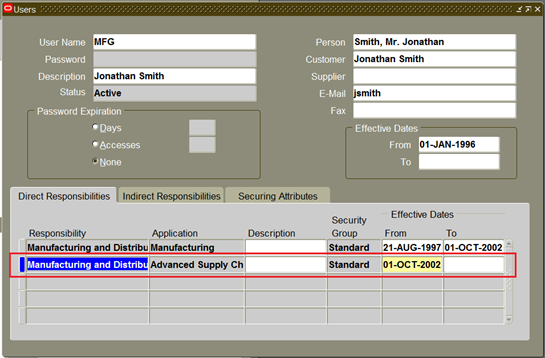
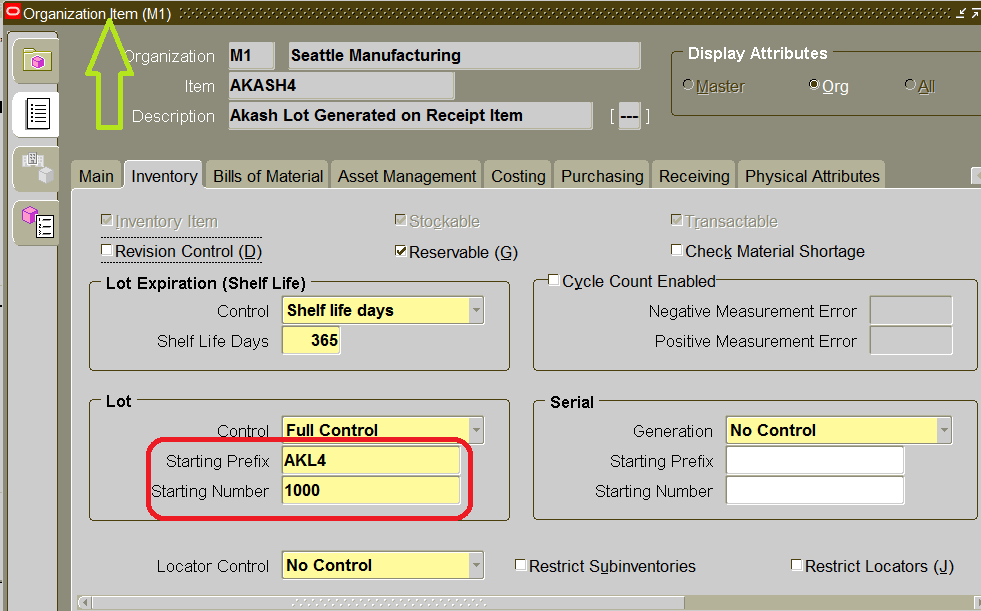
So make sure that total length should be equal or greater than the “Prefix” you defined in Master Item / Organization Item. oracle_error1.3Here in this example prefix’s length is 8 and length in Organization Parameter is 6 which leads to this error. So correct length would be >8

in command prompt, paste following line and check your paths (its for windows OS)

keytool -exportcert -alias androiddebugkey -keystore "C:\Documents and Settings\Administrator.android\debug.keystore"|"C:\OpenSSL\bin\openssl" sha1 -binary |"C:\OpenSSL\bin\openssl" base64

it will be like 0O6mTAJs2OGu0EWG0pwq6fsjhfo=

this might not be correct some time..

so best way to get THE EXACT hash is:

add following code in your activity’s OnCreate() method, as:


protected void onCreate(Bundle savedInstanceState) {

try {

PackageInfo info = getPackageManager().getPackageInfo(“com.photoshop”, PackageManager.GET_SIGNATURES);
for (Signature signature : info.signatures) {

MessageDigest md = MessageDigest.getInstance(“SHA”);
md.update(signature.toByteArray());
Log.i(“KeyHash:”, Base64.encodeToString(md.digest(), Base64.DEFAULT));

}

} catch (NameNotFoundException e) {

Log.e(“KeyHash:”, “Error: ” + e.toString());

} catch (NoSuchAlgorithmException e) {

Log.e(“KeyHash:”, “Error: ” + e.toString());

}

}

//instead of “com.photoshop” ==> replace it with your own package name

it will give you exact key hash value of certificate which your application is using..so no need to find that certificate any more..

I searched many times but didn’t get success to find proper way..

But suddenly I got solution and that is also BY MISTAKE..!!

code to display popup window is as  below:

public class ActivityFormat extends Activity{
private PopupWindow popupVideoFormat;

@Override
protected void onCreate(Bundle savedInstanceState) {

//your normal activity code

//on button click call DisplayFormatDialog() to display popup

}

private void DisplayFormatDialog() {

LayoutInflater inflator = ActivityVideoFormat.this.getLayoutInflater();

View viewVideoFormat = inflator.inflate(R.layout.popup_video_format, null);
popupVideoFormat = new PopupWindow(viewVideoFormat,
android.widget.LinearLayout.LayoutParams.WRAP_CONTENT,
android.widget.LinearLayout.LayoutParams.MATCH_PARENT, true);
popupVideoFormat.showAtLocation(viewVideoFormat, Gravity.CENTER, 0, 0);

//one way is to set close button and dismiss on button click event
ImageView btnClose = (ImageView) viewVideoFormat.findViewById(R.id.btn_close);
btnClose.setOnClickListener(new OnClickListener() {

@Override
public void onClick(View v) {

popupVideoFormat.dismiss();

}

});

}

}

and to dismiss popup on back press just add following code in your ACTIVITY not in popupwindow

@Override
 public void finish() {
if(popupVideoFormat!=null){
if(popupVideoFormat.isShowing()){
popupVideoFormat.dismiss();
}
popupVideoFormat=null;
return;
}
super.finish();
 }

now it will work as a charm..!!


you can close your popup window on back button..!!

Add spaces before and after text in xml

Some time it might be possible that you need additional spaces in text, before and after.

Say instead of only “Login” you might require ”    Login    ”

In android, all text / strings are declared in strings.xml and that adding normal spaces before and after that text in XML is trimmed in screen.

So even if we implement spaces in XML its displayed as below

XML :  <string name=”text_login”>     Login     </string>

1space

Now if we change slight in xml then it will display with desired fore and trail spaces

Updated XML :

Untitled


2spacei.e. &#160 and ; all togather, is equal to one space…

That’s it……!!!!

512_icon

Java Interview Questions android application have been designed specially to get you hands on at the end time of appearing of your interview.

Main feature of this app is as below:
– Cover most of commonly asked question
– Easy to navigate (Next / Previous button as well as Swiping)
– Start application from your last attended question (auto-remembrance)
– Start referring from Beginning at any time by pressing menu

Install direct from market

1

Set alpha (transparency) to Textview

Suppose your application have a some views which are in blinking mode or need some thing like which Fade-in and Fade-out continuously..

At that time if you are using images then you can set its alpha (transparency) easily by using BitmapDrawable.

But if you are using TextView then how to set alpha to content of TextView, so here is solution:

Create object of TextView :
TextView tvAlphaTest = new TextView(context);

To set alpha:
tvAlphaTest.setTextColor(tvAlphaTest.getTextColors().withAlpha(alpha));

we used tvAlphaTest.getTextColors() to get recent color..

When you touch an Edittext field in Android then it will open default virtual keyboard, but suppose you want to hide that virtual keyboard when you touch outside of edittext, then it will not be hidden default, so you can use following code to hide virtual keyboard when touch outside edittext in android

@Override
public boolean dispatchTouchEvent(MotionEvent event) {
    View view = getCurrentFocus();
    boolean ret = super.dispatchTouchEvent(event);

    if (view instanceof EditText) {
        View w = getCurrentFocus();
        int scrcoords[] = new int[2];
        w.getLocationOnScreen(scrcoords);
        float x = event.getRawX() + w.getLeft() - scrcoords[0];
        float y = event.getRawY() + w.getTop() - scrcoords[1];
        
        if (event.getAction() == MotionEvent.ACTION_UP 
 && (x = w.getRight() 
 || y  w.getBottom()) ) { 
            InputMethodManager imm = (InputMethodManager)getSystemService(Context.INPUT_METHOD_SERVICE);
            imm.hideSoftInputFromWindow(getWindow().getCurrentFocus().getWindowToken(), 0);
        }
    }
 return ret;
}

It will dispatch your activity’s event..

That’s all..!
//pagead2.googlesyndication.com/pagead/js/adsbygoogle.js

(adsbygoogle = window.adsbygoogle || []).push({
google_ad_client: “ca-pub-7653847566161736”,
enable_page_level_ads: true
});